
Plan a three-layer lighting scheme that lights work surfaces first: put task lights over the front edge of counters and islands, add under-cabinet strips, then layer in ambient and accent fixtures on separate circuits and dimmers. Check lumens, CCT, CRI, IP or fire-rating, and dimmability before you buy anything. Start now by sketching your counters and marking the front edges where your task row will go.
TL;DR:
- Aim for 300 to 500 lux on worktops; downlights often need 400 to 800 lumens each, with beam angle and spacing determining coverage.
- Keep ambient, task, and accent lighting on separate circuits or dimmers; one switch prevents cooking, cleanup, and dinner settings from working independently.
- Space counter downlights about 4 to 5 feet apart as a starting point, then confirm positions with each fixture’s photometric data.
- Place strips beneath cabinets near their front lips, choose a diffused lens, and match their color temperature and color rendering to overhead fixtures.
- Check moisture ratings near sinks and cooktops, fire rated housings for recessed lights in insulated ceilings, and LED compatible dimmers before ordering fixtures.
Table of Contents
- Why Lighting the Counters, Not the Floor, Is the Whole Plan
- The Three Layers: Ambient, Task, and Accent
- Step-by-Step: Drafting Your Downlight and Pendant Layout
- Specs to Require on Every Fixture You Buy
- Getting Island Pendants Right
- Under-Cabinet Lighting: Where and How to Place It
- Wiring It for Real Use: Circuits, Dimmers, and Smart Controls
- Common Mistakes and How to Fix Them
- Pro Checklist and a Worked Example
- Why We Plan Lighting Early, Not Last
- How We Handle Lighting as Part of Your Kitchen Remodel
- FAQ
- Sources
Why Lighting the Counters, Not the Floor, Is the Whole Plan
A kitchen is a workspace before it’s anything else, and most lighting problems trace back to one mistake: fixtures placed to look balanced from the doorway instead of placed where hands actually work. When a downlight sits behind you at the counter, your own body blocks the light and casts a shadow exactly where you’re chopping or reading a recipe. Lighting designers describe kitchens as task environments first, where light needs to follow the person at the counter rather than sit in a tidy grid across the ceiling, according to Ross Lighting’s layout guidance.
Skipping this principle during a remodel causes problems you’ll notice every single evening:
- Self-cast shadows over the sink, stove, and prep areas that make close work harder and less safe.
- Inconsistent color rendering that makes food look off and makes it tough to judge doneness.
- Costly rework later, since moving recessed cans after drywall and ceiling finishes are done means patching and repainting.
- Poor night-time usability when the only light source is a center fixture that leaves the counters dim.
Getting the layout right before installation costs nothing extra. Getting it wrong costs a second round of electrical work.
The Three Layers: Ambient, Task, and Accent
A kitchen that feels right, whether you’re prepping breakfast or hosting a dinner, runs on three distinct lighting layers working together rather than one fixture trying to do everything.
- Ambient lighting fills the room with general, even light, usually from recessed downlights, a flush mount, or a central fixture.
- Task lighting targets specific work zones: under-cabinet strips over counters, downlights over the sink and stove, and pendants over an island.
- Accent lighting adds depth and mood, such as toe-kick LEDs, glass-front cabinet lights, or a statement fixture over a dining nook.
Each layer should have its own switch or dimmer. Lumens’ kitchen lighting guide recommends treating ambient, task, and accent as separate systems rather than one combined circuit, since the way you use your kitchen changes throughout the day. During morning prep, you likely want only task lighting over the coffee station and counter, not the full room lit up. While cooking, you need bright, shadow-free light over the stove and island. At a sit-down dinner, you probably want task lighting off entirely, with ambient dimmed low and accent lighting doing the work. Cleanup calls for everything on at full brightness.
Wiring these as one circuit forces an all-or-nothing kitchen. Separate zones give you a room that adapts to what you’re actually doing in it.
Step-by-Step: Drafting Your Downlight and Pendant Layout
Here’s the method to sketch a layout you can hand directly to an electrician or your remodeling contractor.
- Measure the room and ceiling height. Standard ceilings run 8 to 9 feet; note any sloped or vaulted sections separately.
- Draw the front edge of every countertop, not the centerline of the room. This line is where your task fixtures belong.
- Mark fixed points: sink, cooktop, island, and any peninsula. These zones need direct task coverage.
- Choose your downlight mounting height above the counter, typically tied to your ceiling height minus counter height.
- Set spacing using a mounting-height heuristic. For roughly 5 feet of mounting height above a counter, start with an initial 4 to 5 foot spacing range for broad-beam downlights, then adjust based on the fixture’s actual photometric data, according to Ross Lighting. A related guideline from LightHub Direct suggests spacing closer to 1 to 1.2 meters (roughly 3.3 to 4 feet) between fittings directly over work surfaces.
- Target worktop brightness of 300 to 500 lux, a range LightHub Direct ties to downlights in the 400 to 800 lumen range each, depending on beam angle and spacing.
Statistic Callout: A practical ambient benchmark is roughly 30 to 40 lumens per square foot for general kitchen lighting, separate from the brighter, more concentrated output you need directly over work surfaces.
Beam angle changes everything about spacing. A narrow beam throws a tight pool of light, while a wider beam spreads light over a broader area. Two fixtures with identical lumen output can require different spacing depending on beam angle, which is why manufacturer photometric data, not a generic rule of thumb, should confirm your final count.
Once your task row is set, add ambient fixtures to fill gaps and avoid leaving the center of the room dark. Resist the urge to add more cans than your task-first layout calls for. An over-dense grid wastes money, adds glare, and rarely fixes a shadow problem that proper placement over the front counter edge would have solved from the start.
Specs to Require on Every Fixture You Buy
Before you order a single fixture, lock in five specs so every layer matches and performs the way you expect.
- CCT (color temperature): choose a color temperature suited to each zone, and consider CCT-switchable fixtures if your kitchen serves double duty as a living space.
- CRI (color rendering index): higher CRI renders food and skin tones accurately. Check the product’s Lighting Facts label rather than assuming.
- Lumens, not watts: lumens measure actual light output, while watts only measure energy draw. The DOE’s LED color characteristics guidance points to Lighting Facts labels as the place to verify lumen output, efficacy, CRI, and CCT before you buy.
- IP rating: fixtures near sinks or cooktops should carry a damp or wet-location rating.
- Fire-rated housings: required for recessed downlights where the ceiling penetration meets an insulated or fire-separated space.
- Dimmer compatibility: confirm LED-compatible, trailing-edge dimmers to avoid flicker or buzzing.
Statistic Callout: The DOE notes that white LED light is most often produced through phosphor conversion, and that products vary enough that a visual check matters wherever color appearance is important, such as over a kitchen island where you’re evaluating food.
Don’t rely on spec sheets alone for color quality. If you’re choosing between fixtures from different manufacturers, look at them lit side by side before committing to a whole-kitchen order.
Getting Island Pendants Right
Pendants are the fixture most likely to go wrong, usually by being too small, too high, or poorly spaced for the island beneath them.
- Count by island length: choose the number of pendants to suit the island, centered along its length rather than the room’s centerline.
- Height: position pendants with your own height and sightlines across the island in mind.
- Scale: undersized pendants look like an afterthought. Size them boldly enough to read as a real fixture from across the kitchen.
- Leave room for downlights between pendants so task light still reaches the island surface even when the pendants themselves are more decorative than functional.
- Put pendants on their own dimmer, separate from your task downlights, so you can dial in ambience without losing counter visibility.
Decorative island fixtures work best as part of a controllable, layered system rather than the only light source over that surface, a point designers covering 2026 lighting trends raise consistently when discussing statement fixtures.
Under-Cabinet Lighting: Where and How to Place It
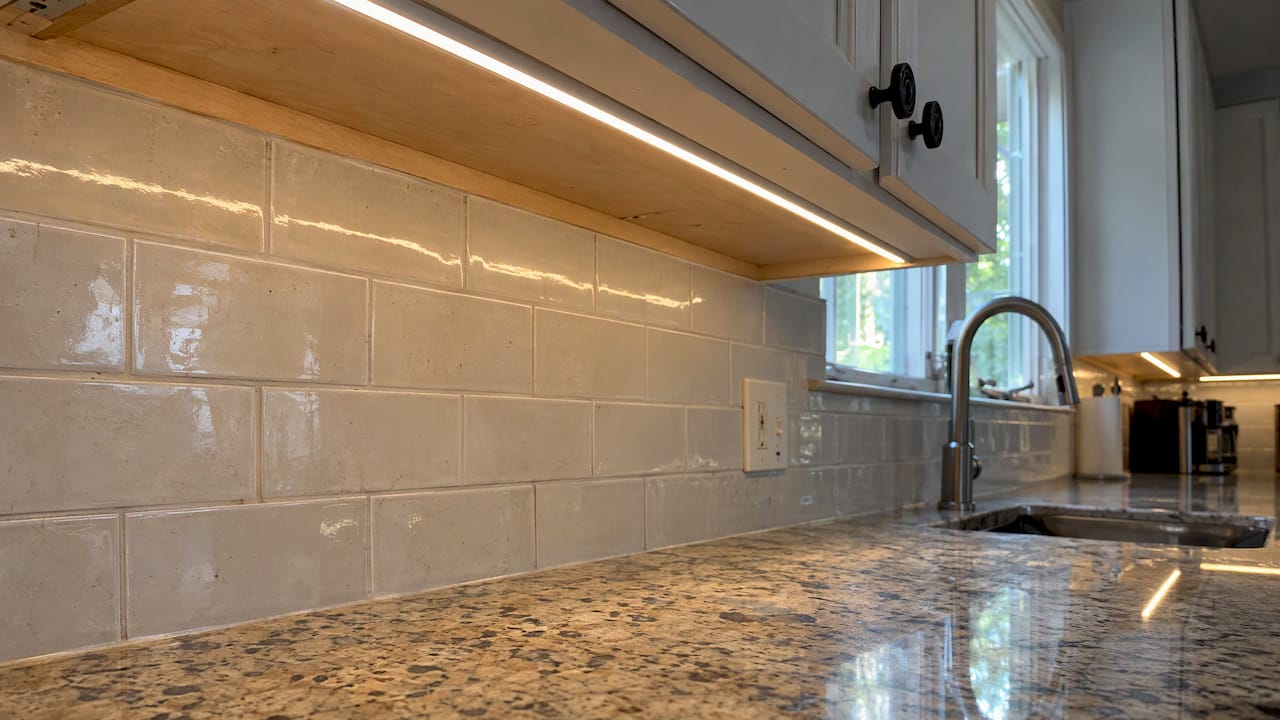
Under-cabinet lighting does more real work than almost any other fixture in the kitchen, yet it’s the one homeowners most often get wrong by centering it under the cabinet instead of positioning it toward the front edge, where the light actually reaches the counter rather than bouncing off the backsplash.
LED strips and slim linear fixtures both work well, but they solve slightly different problems. Strips are flexible and cheap to run along long cabinet runs; linear fixtures give more even, less dotted light and often integrate a better diffuser. Whichever you choose, check:
- Lumens per foot, so brightness is consistent across different cabinet lengths.
- CRI and CCT, matched to your downlights so the counter doesn’t look like two different rooms.
- IP rating, if the run is near a sink or an open window exposed to moisture.
- Driver location, since a visible or poorly placed driver box can be an eyesore inside an open cabinet.
Pro Tip: Choose a fixture with a frosted or diffused lens rather than a bare LED strip, since bare strips cast visible dots of light rather than a smooth wash across the counter.
Mount the strip or fixture just behind the cabinet’s front lip, run wiring through the back of the cabinet to a hidden junction, and switch under-cabinet lighting separately from your overhead task row so you can run a soft work light late at night without flooding the whole kitchen.
Wiring It for Real Use: Circuits, Dimmers, and Smart Controls
A layered lighting design only pays off if the switching matches it. Plan for at minimum three separate lighting groups, ambient, task, and accent, each on its own switch or dimmer, so you can combine them to match whatever you’re actually doing in the kitchen.
- Use LED-compatible, trailing-edge dimmers to avoid the flicker or buzz that standard dimmers cause with LED drivers.
- Test with your actual fixtures before finalizing, since dimmer and driver compatibility varies by manufacturer.
- Consider CCT-switchable drivers on at least your ambient or task circuit if you want flexibility between a crisp white for cooking and a warmer tone for evenings.
- Ask your electrician about smart switches or scenes if you want one-touch presets, like “cooking,” “cleanup,” or “dinner,” rather than adjusting three dimmers individually every time.
Putting this in writing as part of your remodel spec, rather than leaving it to be decided on-site, avoids the most common wiring mistake: everything landing on one circuit because nobody flagged the zoning in advance.
Common Mistakes and How to Fix Them
Most kitchen lighting complaints trace back to a short list of repeatable errors.
- Centered-only fixtures: a single ceiling grid centered on the room leaves counters in shadow. Fix by adding a task row along the front counter edge.
- Pendants too high or too small: throws off proportion and leaves the island surface under-lit. Fix by resizing and adjusting their height to suit the island and sightlines.
- Mismatched CCTs across layers: makes a kitchen look like it has two different light sources fighting each other. Fix by standardizing CCT within each zone.
- No zoning: one switch for everything limits how the room can be used. Fix with separate circuits before drywall closes the ceiling.
A retrofit can often fix under-cabinet and pendant issues without major rework. Centering and zoning problems usually need a licensed electrician involved before final inspection, since they touch wiring behind the walls.
Pro Checklist and a Worked Example
Before finalizing your plan, run through this checklist: measure the room, mark front counter edges, choose CCT and CRI, select fixtures, confirm IP and fire-rating and dimmer compatibility, plan your three circuits, and get photometric data from your electrician for final spacing.
- Measure your island: say it’s 8 feet long.
- Using a 4 to 5 foot spacing heuristic, that supports two to three pendants centered along its length.
- Add two to three downlights between and around the pendants for task coverage, following the same spacing logic from the layout section above.
Use the spacing guidance and your specific fixture’s photometric data to plan positions before ordering.
Bring measurements, counter-edge sketches, and your CCT and CRI preferences to your first consult with an electrician or remodeler so the conversation starts from a real plan instead of a blank slate.
Why We Plan Lighting Early, Not Last
Lighting decisions belong at the design and rough-in stage, not bolted on after cabinets are hung. We coordinate lighting layout as part of full kitchen remodels, backed by project management and a satisfaction guarantee, so wiring, cabinetry, and fixtures get planned together instead of fought over later. If you’re weighing a remodel, that’s worth a conversation before you buy a single downlight.
— Mark
How We Handle Lighting as Part of Your Kitchen Remodel
We build lighting layout into every kitchen remodel we manage, so you’re not coordinating trades and fixture orders on your own.

- Trades handle the wiring, circuits, and fixture installation as one coordinated project, not a patchwork of separate trips.
- Our kitchen remodeling process in Sarasota includes lighting planning alongside cabinetry, countertops, and layout decisions.
- A satisfaction guarantee backs every project.
- If your project also touches island plumbing, our plumbing remodel partners can help coordinate sink and fixture rough-ins.
If you’re ready to talk through your layout, request a consultation and we’ll walk through your space, your counters, and your lighting plan together.
FAQ
What is the current trend for kitchen lighting?
Layered lighting with fixtures set at different heights, controlled by dimmers, is the dominant current approach, letting one kitchen shift between bright task lighting and softer evening ambience. Designers increasingly treat decorative island fixtures as part of a controllable system rather than a standalone centerpiece, according to coverage of current lighting trends.
What are the trends in kitchen lighting for 2026?
Integrated LEDs, narrower-beam downlights, linear chandeliers, and wall lights positioned near open shelving are among the trends designers highlight for 2026 kitchens. Dimmable, layered schemes remain the throughline, with decorative fixtures used as accents rather than the primary light source.
What is the ideal lighting for a kitchen?
The ideal setup layers ambient, task, and accent lighting on separate switches, with task lighting over counters and the island taking priority since that’s where most kitchen work happens. A practical ambient benchmark is roughly 30 to 40 lumens per square foot, with worktops needing brighter, more direct task light layered on top.
What are the common kitchen lighting mistakes?
The most frequent mistakes are centering fixtures in the middle of the room instead of over counters, which creates shadows exactly where you’re working, and putting every fixture on one switch instead of separate zones. Mismatched color temperatures between under-cabinet strips and overhead downlights is another common issue that makes a finished kitchen look inconsistent.
Sources
- Kitchen Recessed Lighting Layout: Practical Guide
- LED Color Characteristics
- Kitchen Lighting Design | How to Light a Kitchen at Lumens