
The best under cabinet lighting for most kitchens is a hardwired or plug-in LED light bar or tape light, in a warm white of 2700K to 3000K, mounted near the front of the cabinet and aimed at the counter. Pucks suit accent spots, but bars give the most even light. How you power it decides who installs it. Below you’ll find each type, the numbers that matter, where to put the fixtures and when to bring in an electrician.
Key Takeaways
- LED is the default choice. It runs cooler and uses far less electricity than halogen or xenon, and it can be made thin enough to hide behind a cabinet rail.
- Light bars give the most even light, tape follows tricky layouts, and pucks create pools of light, so space them closely.
- Aim for warm white (2700K to 3000K) and enough output: at least 200 lumens per foot for strips is a common recommendation.
- Mount fixtures toward the front of the cabinet and use the longest run that fits. This cuts shadows, and lensed or back-aimed lights cut glare on polished counters.
- Plug-in and battery lights are generally DIY-friendly. Hardwired systems call for a licensed electrician, and the best time to plan them is during a remodel.
Table of Contents
- What under cabinet lighting does in a kitchen
- Under cabinet lighting types
- Power options: hardwired, plug-in or battery
- Brightness, color temperature and dimming
- Under cabinet lighting placement
- Do you need an electrician?
- A simple way to choose
- Plan your lighting with your remodel
- Frequently asked questions
- Sources
What under cabinet lighting does in a kitchen
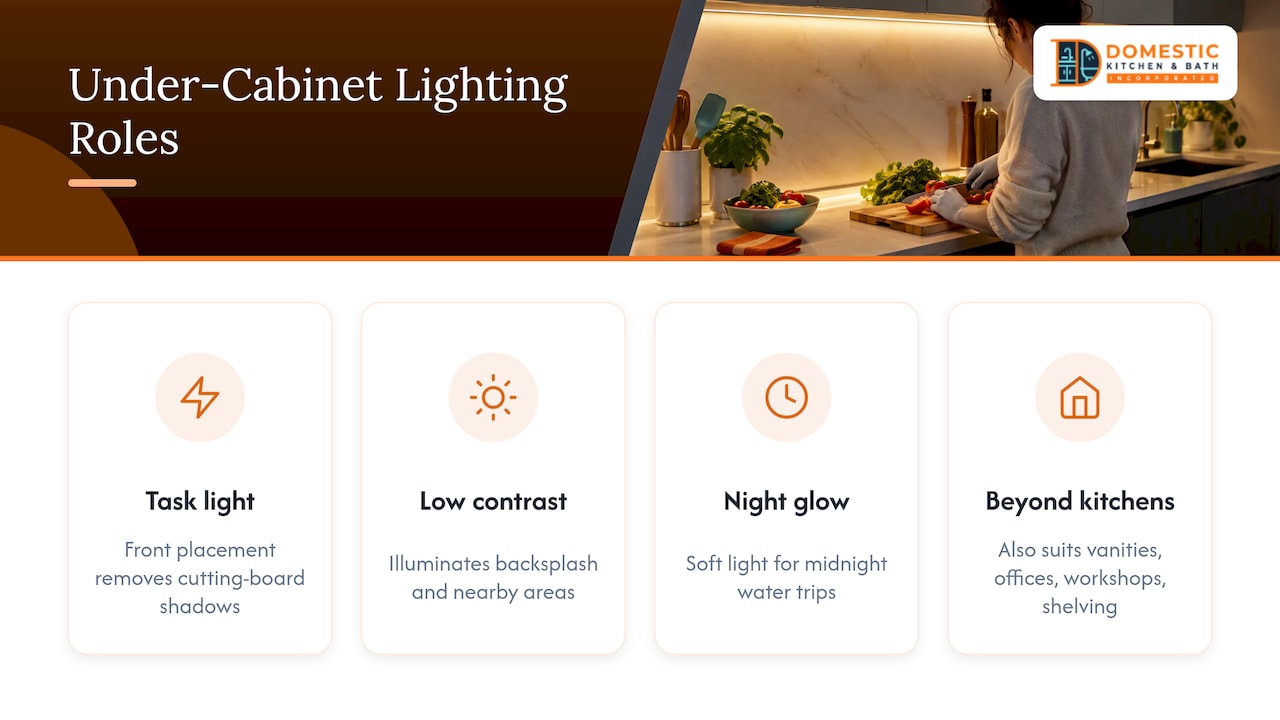
Under cabinet lighting is a set of fixtures mounted beneath your wall cabinets that shine down on the countertop. Overhead lights are usually behind you as you work, so your body throws a shadow onto the cutting board. Lights under the cabinet sit in front of you and remove that shadow.
The U.S. Department of Energy’s guidance says the first job of under-cabinet lighting is enough light for tasks on the work surface. The second job is lighting the backsplash and nearby areas so the contrast between bright counter and dark wall stays low. That second point is why a dim, spotty setup feels tiring even when the counter itself is lit.
These lights also work as a soft nighttime glow, which many families prefer to switching on the main ceiling lights for a midnight glass of water. And they are not just for kitchens. Bathroom vanities with upper cabinets, home offices, workshops and shelving all benefit from the same approach.
Under cabinet lighting types
There are two questions to answer: what shape the fixture takes and what light source it uses. Start with shape.
Light bars
A light bar is a rigid, linear fixture, usually aluminum or plastic with the LEDs inside a diffuser. Bars produce even, continuous light with no hot spots, which is why they are the most common pick for long, straight counters. Many link end to end, so you can cover a 10-foot run with one clean line.
Tape and rope lights
Tape light is a flexible LED strip with an adhesive back. It can be cut at marked points and fits complex or uneven areas such as angled cabinets or short stretches between a window and a range hood. Tape is also the easiest type to hide in a channel. Its quality varies widely, so check the lumens per foot and the color consistency instead of buying on length and price alone.
Puck lights
Pucks are small round fixtures that cast a circle of light. They are easy to place and good for lighting glass-front cabinets or a display. On a countertop they can create bright spots with darker gaps in between, which is the scalloped look many homeowners dislike. If you use them, space them closely (more on that below).
Integrated cabinet lighting
Some cabinetry is built with lighting already designed into the rails, valances or recessed channels. This gives the cleanest look because no fixture is visible. It works best when planned with the cabinets, not added later, which is why we raise lighting at the design stage of every kitchen project.
Light source: LED, fluorescent, halogen, xenon
Bob Vila’s testing lists LED, fluorescent, halogen and xenon as the four source types, and calls LED the most popular. ENERGY STAR notes that certified LED fixtures are thin, use substantially less electricity than halogen or xenon bulbs and direct light toward the work surface. The DOE adds that LED directionality suits task lighting, because light goes where you need it instead of in every direction. For a new install today, there is little reason to choose anything else.
| Type | Best for | Light quality | Watch out for |
|---|---|---|---|
| Light bar | Long, straight counters | Even, continuous | Needs a clear, flat mounting surface |
| Tape / rope | Irregular runs, hidden channels | Even if the strip is high density | Quality varies; needs a diffuser or channel |
| Puck | Accent, glass-front cabinets, short runs | Pools of light | Bright spots and scalloping if spaced wide |
| Integrated | New or custom cabinetry | Cleanest look | Best planned before the cabinets are built |
Power options: hardwired, plug-in or battery
The power source affects cost, appearance and who can install it. Country Living’s roundup describes the range: batteries (standard or rechargeable), systems that plug into a nearby outlet, and hardwired systems.
- Battery or rechargeable: no wiring at all, so they are the easiest to install. They suit a rental-style quick fix or a closet, but you will be changing or recharging them, and they are rarely bright enough for a primary work counter.
- Plug-in: a cord runs to an outlet. Installation is simple, but you will see the cord unless you plan around it, and the outlet may be in the wrong place.
- Hardwired: connected to your home’s wiring and controlled from a wall switch or dimmer. There are no cords, no batteries and a clean finish. This is the choice we recommend for a kitchen you plan to live in for years.
LED pucks add one more variable. PROLIGHTING notes they may be 12-volt low-voltage, 120-volt line-voltage or battery-operated, so check the voltage and the driver (power supply) before you buy. This Old House says 12V and 24V systems are common for under-cabinet use, which means a driver tucked somewhere accessible, such as inside a cabinet or above it.
Brightness, color temperature and dimming
How bright
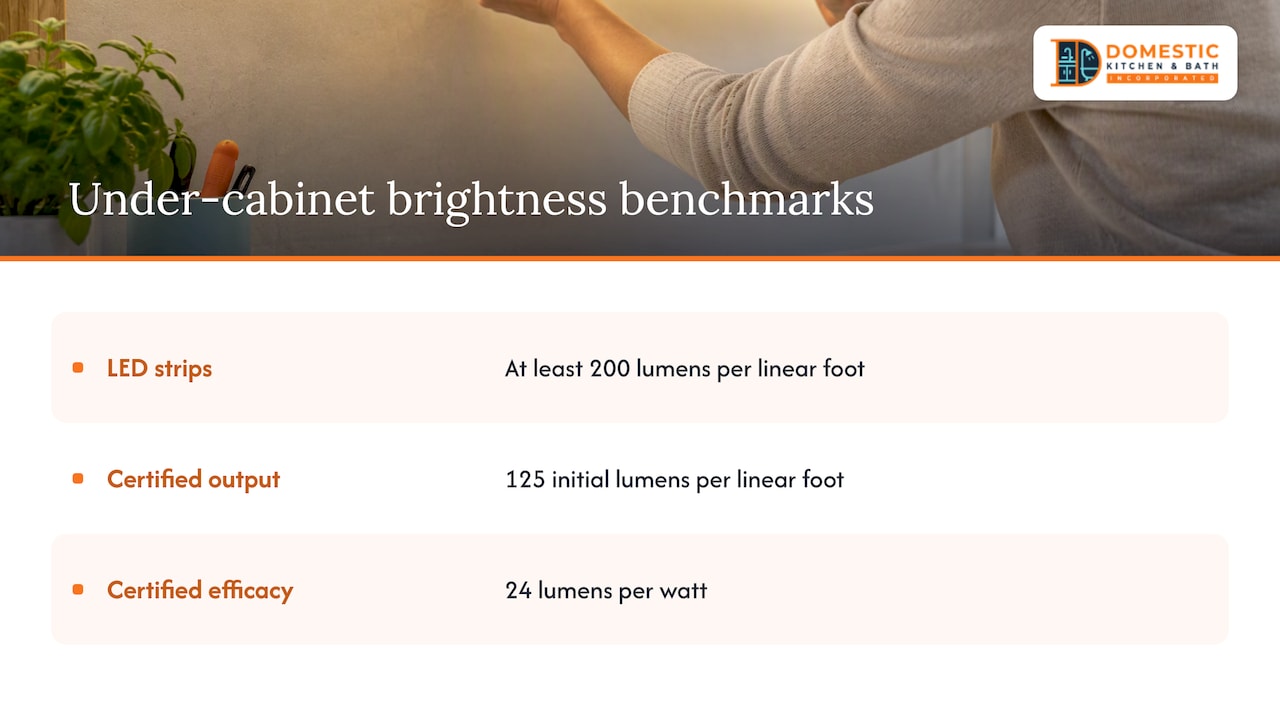
Brightness is measured in lumens. For kitchens, the useful number is lumens per linear foot. This Old House recommends at least 200 lumens per foot for LED strips under cabinets. ENERGY STAR’s criteria for under-cabinet kitchen fixtures set a floor of 125 initial lumens per linear foot and 24 lumens per watt. Treat that as a minimum for certified products and go higher if you chop, roll dough or read recipes at the counter, or if your countertop is dark. Dark granite and quartz absorb a lot of light.
How warm
Color temperature is measured in Kelvin. ENERGY STAR’s criteria allow 2700K, 3000K and 3500K for these fixtures. This Old House identifies 2700K to 3000K as a popular warm-white range for kitchens. Warm white flatters wood cabinets and most backsplash tile, and it blends with the bulbs you likely already have overhead. Cooler light can look clinical against warm materials. Whatever you choose, keep every fixture in the kitchen within a similar range so the room does not look patchy.
Dimming and smart control
The DOE lists low profile, low operating temperature, dimming capability and long life as attributes you may find in LED under-cabinet products, and it warns that performance varies from product to product. So confirm that the specific fixture and driver you choose are dimmable, and that the dimmer you pair with them is compatible. A mismatch causes flicker or buzzing.
Dimming matters because one setting rarely suits every moment. Bright for meal prep, low for an evening glow. Some smart systems also let you change the color temperature, giving brighter, cooler light for active work and warmer, dimmer light for the evening.
Check the color quality
Look for a high color rendering index (CRI) on the spec sheet. A low CRI makes produce, meat and tile look dull or off-color. The spec sheet will show it, and a reputable fixture lists it. A fixture that hides its specs deserves a second look.
Under cabinet lighting placement
Placement matters as much as the fixture. The same light bar can look great or harsh depending on where it sits.
Front of the cabinet, not the back
Pro Remodeler’s guidance is to put fixtures at the front of the upper cabinets and use the longest fixture that fits for even coverage. Lighting from the front lights the whole counter depth, including the part right in front of you. Tucked at the back wall, a fixture lights the backsplash and leaves the edge of the counter dim. A small rail or face frame under the cabinet is handy here: it hides the fixture from anyone standing in the room.
Handling glare on shiny counters
Polished stone and glossy quartz reflect light, and a bare LED can show up as a row of bright dots. Two fixes work. Use fixtures with lenses or diffusers, as the same guidance recommends. Or, for very shiny counters, mount toward the back and aim toward the backsplash so the reflection is angled away from your eyes. A matte or honed finish is more forgiving than a polished one.
Spacing pucks
If you go with pucks, a typical rule is about one puck for every 8 to 12 inches of cabinet space to avoid pooling and scallops. Closer spacing gives smoother light. That is also why a continuous bar or tape usually looks better on a long counter.
Measure the runs correctly
Measure the usable length under each cabinet, not the overall wall length. Breaks for hoods, windows and corners count as separate runs. A fixture that is two inches too long will not fit, and one that is too short leaves a dark gap. Sketch the kitchen, mark each cabinet run, and add up the lengths before you shop.
Plan the switch and the wiring path
Decide where the switch or dimmer will go, and how the wire reaches the fixtures. In a finished kitchen, hiding the wire can mean opening drywall or running it through cabinet interiors. In a remodel, it is simple: the wall is open anyway.
Do you need an electrician?
It depends on the power source. Battery and plug-in fixtures are generally DIY-friendly, while hardwired lighting calls for a skilled electrician. Country Living puts it plainly too: hardwired systems can be tricky, so hire an electrician unless you are a skilled DIYer.
Call a licensed electrician if you want any of the following:
- Fixtures wired to a wall switch or dimmer with no visible cord
- A new circuit or outlet to feed the lights
- Wiring that runs inside finished walls or through cabinets
- A driver or transformer placed above or inside the cabinets
Also check the location rating. Kitchens produce steam and moisture, and Ferguson’s guide explains the difference between dry, damp and wet ratings, noting that damp-rated fixtures suit places where kitchen moisture and steam may reach them. A fixture near a sink or cooktop should carry a rating that matches its spot. In Florida’s humid climate, we pay particular attention to this. Wiring work also falls under local permitting rules, so ask your electrician whether a permit applies to your project.
A simple way to choose
- Measure the usable cabinet runs and note any breaks.
- Pick the source: LED, unless you have a specific reason not to.
- Pick the form: bars for straight runs, tape for odd angles, pucks only for accents or glass cabinets.
- Pick the power: hardwired for a permanent, clean result; plug-in for a quick upgrade.
- Check the numbers: at least 200 lumens per foot, 2700K to 3000K, dimmable, damp-rated near water, high CRI.
- Place at the front of the cabinet, with a diffuser or lens, and test before you fix anything permanently.
Test by taping the fixture temporarily where you plan to mount it, then turn it on at night. You will see glare and shadows right away.
Our take on lighting
We have remodeled kitchens in Sarasota for over 25 years, and lighting is the item homeowners most often add last and regret not planning first. When the walls are open, running wire for under-cabinet lights, a dimmer and a hidden driver costs very little extra effort. After the kitchen is finished, the same work means patching and repainting.
That is why we design lighting alongside cabinetry, countertops and backsplash from day one. A dark countertop needs more output than a light one. A glossy surface needs lensed fixtures. A glass-front cabinet needs a different approach than a solid one. Our 3D planning lets you see those choices before anything is built.
Our licensed and insured team handles the electrical, cabinetry and finish work under one project manager, so the lighting is part of the plan and not an afterthought.
Mark
Plan your lighting with your remodel
If you are already thinking about new cabinets or countertops, this is the cheapest time to add under-cabinet lighting. We design and build custom kitchens across Sarasota and surrounding areas, including lighting, electrical, cabinetry, countertops and backsplash. Our published range for kitchen remodeling is $25,000 to $45,000, depending on scope and finishes.

See our kitchen remodeling services or check the current kitchen remodel offer for the latest details. We back our work with a satisfaction guarantee and clear, transparent pricing. If you would like more planning ideas first, our kitchen and bath blog has more guides.
Frequently asked questions
What lights are best for under cabinets?
For most kitchens, LED light bars or high-density LED tape in a warm white of 2700K to 3000K work best. They give even light, run cool and use little power. Pucks are better kept for accent or display areas.
Do you need an electrician to install under cabinet lighting?
Only for hardwired systems. Plug-in and battery-powered fixtures are generally DIY-friendly. If you want a wall switch, a dimmer and no visible cords, hire a licensed electrician, and ask whether your local permit rules apply.
How far apart should under cabinet lights be?
For pucks, a common rule is one every 8 to 12 inches of cabinet space. Closer spacing reduces bright spots. Bars and tape need no spacing because the light is continuous, which is why they suit long counters.
How bright should under cabinet lighting be?
Aim for at least 200 lumens per foot for LED strips, and go higher for dark countertops or heavy food prep. A dimmer lets you lower the output in the evening, so brighter is rarely a problem.
Where should you mount the lights?
Toward the front of the cabinet, just behind the face frame, with the light aimed down or slightly back toward the backsplash. This lights the full counter and reduces glare and shadows on polished surfaces.
Sources
- Residential Undercabinet Lighting with LEDs, U.S. Department of Energy
- Renovate with ENERGY STAR buyer’s guide
- ENERGY STAR SSL final criteria
- The Best Under-Cabinet Lighting, Bob Vila
- How to Install Undercabinet LED Lighting, This Old House
- The 8 Best Under-Cabinet Lighting Options, Country Living
- Undercabinet Lighting Dos & Don’ts, Pro Remodeler
- Under Cabinet Lighting Placement Guide, KraftMaid
- Under Cabinet Lighting Buying Guide
- Undercabinet Lighting Guide
- A Guide to LED Under Cabinet Lighting, PROLIGHTING
- Under Cabinet Lighting Ideas, Philips Hue
- A Complete Under-Cabinet Lighting Build, LED Club
- Under-Cabinet Kitchen Lighting Buying Guide, Ferguson Home